Category: Azure Data Plattform

Azure Synapse Data Ingestion Using Notebooks (Azure Plattform Compare Series Part 5)

Hello fellow Data Enthusiasts and welcome to my Blog,

today we’re checking out how to ingest data with Azure Synapse Notebooks.

But lets start with the basics. Our target architecture is a medallion lakehouse architecture. So we create a container for each layer in our storage account.

If you don’t have a Synapse workspace please check my post how to create one. Afterwards we need to create a Spark Cluster in our Synapse Workspace, which can be done within the Synapse Workspace.

Clusters are sized in Tshirt measurements (S, M, L etc.). Since S is already quite big it will probably be enough for the most tables. Since these Clusters are payed by use it could be reasonable to create different clusters for different tables. E.g. for Dimensions Small and for Facts Medium.

When the cluster is created, it’s possible install packages on the Spark clusters via the management console in the Synaspe workspace.
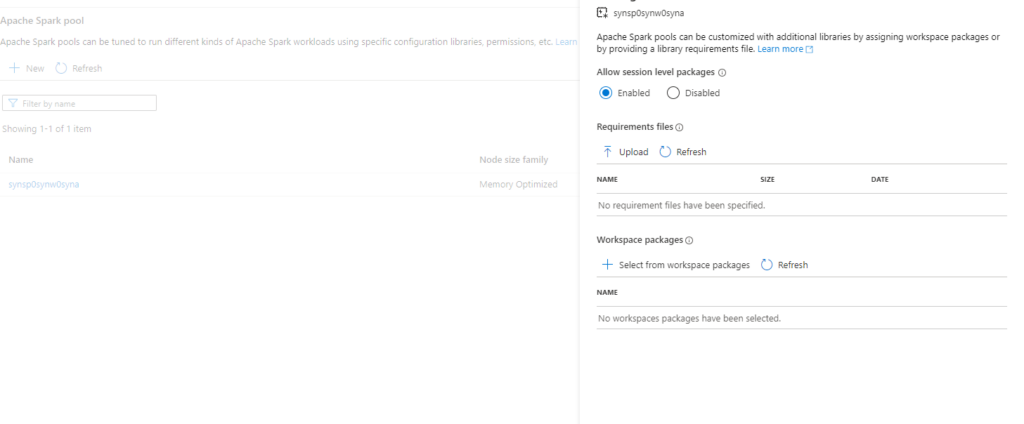
Packages that are used in several different clusters can be added to the workspace via the Azure Portal.

This allows us to connect to any API thats available in python or via python libraries.

Since we’re trying to copy data from an azure storage we don’t any additional libraries.

In this usecase only our system assigened managed identity has access to the storage. So in order to test and develop our notebook we need to configure to use this one for authentication and context. This can be done within the notebook if you choose the gear in the top right corner and then enable the ‘Run as managed identity’- option.

Mountpoints vs Path

Usually I prefer to use mountpoints within spark, since this is the easiest solution to work with relative paths but on synapse there is a limitation, that its not possible to mount a whole container.

Even if you create it with a subfolder there still is another issue, where the mount command in Synapse doesn’t allow to use linked services with parameters. But since my earlier post, we all know that parameters are the best.
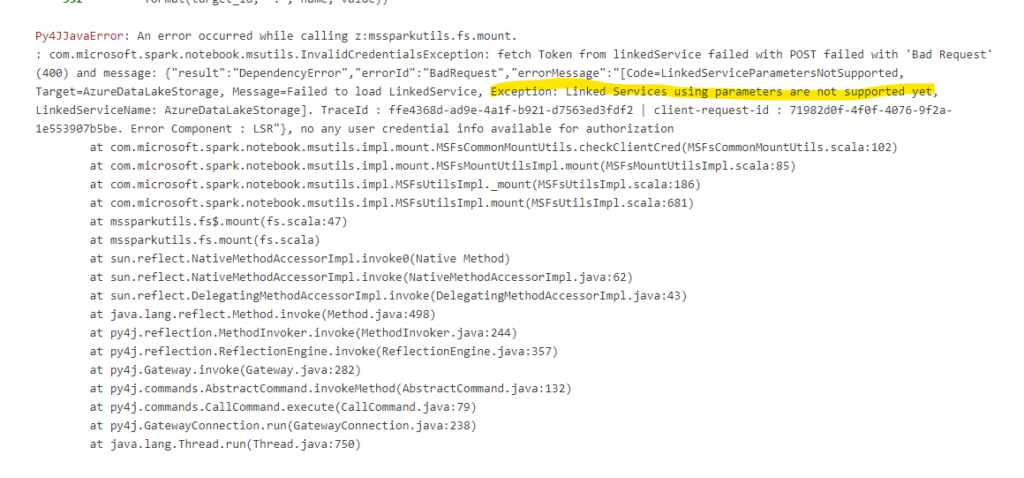
So Synapse is the exeption from the rule of thumb to use mountpoints. Instead I usually create a Setup Notebook which gets the connection Information from the keyvault, the same connection we’ve used in our dynamic linked service and write them into different variables.

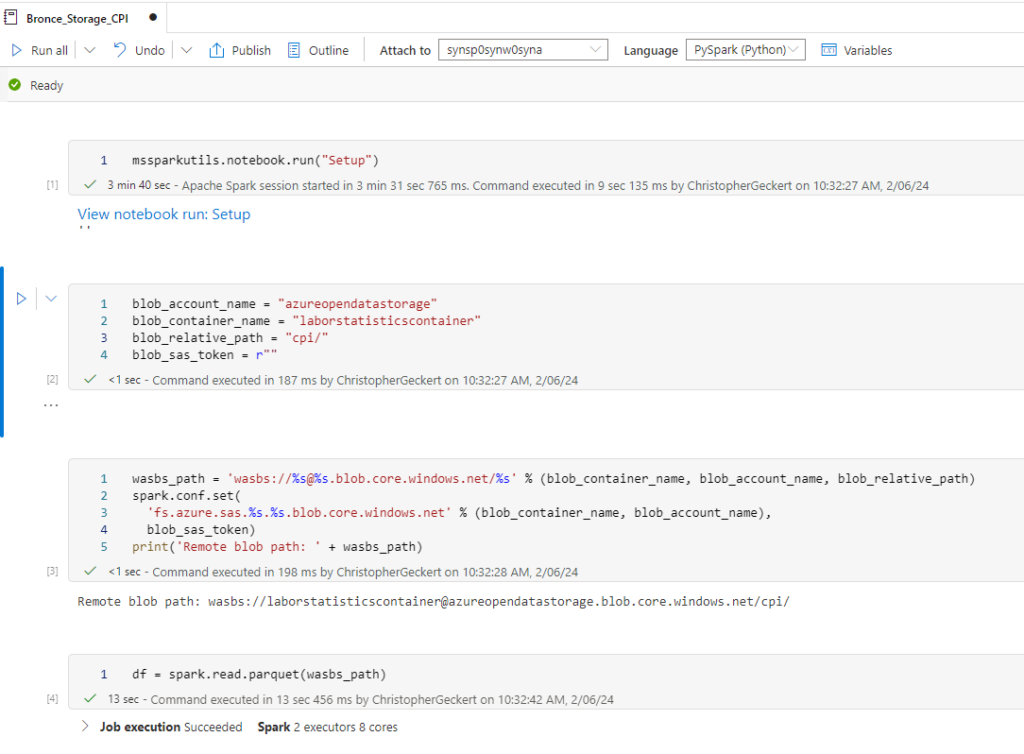
Now every Notebook that is executed now first calls the Setup Notebook and then has these variables available.

We can now create a Notebook for each source system and replicate the data into our bronce layer.

Since we want to analyse the US Labor Data we now can connect to the Consumer Price Index Data provided by Microsoft. Afterwards we can read the data into a dataframe and write it as parquet file into our own datalake. So the whole Notebook looks something like this.
I hope this post gave you an short introduction, how you could replicate data into your environment.

Azure Synapse Data Ingestion Using Pipelines (Azure Plattform Compare Series Part 4)

Hello fellow Data Enthusiasts and welcome to my Blog,

today we’re checking out how to ingest data into Azure Synapse with Pipelines and the Copy Data Task.

Before you start into this post please make sure you know how dynamic linked services work, since we’ll use this here.

Integration Dataset

If you’ve created a dynamic linked service you could get startet with an Integration Dataset. An Integration Dataset is a logical reference to your data. Probably the best feature here is, that they can work schemaless, so you don’t need a new Integration Datset for each source you want to extract.

In order to create one, select the Data tab and then change the view to ‘Linked’. Click the + sign and select ‘Integration Dataset’.

This will open a dialogue which lets you choose all the different sources. In my case I want to Ingest some Files, which are stored on a Datalake.

The Azure Data Lake Storage Gen2 connector has two steps, where you first select the actual connector and afterwards select which kind of files you want to read/write.

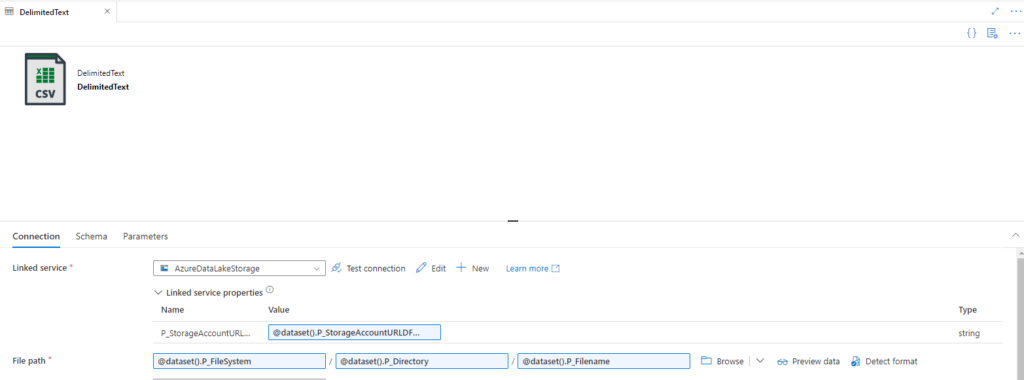
Here is an example how the csv connection looks like. Just type a descriptive name and select the linked service, then you’re ready to go.

After creation start to create parameters, since we want to use the same dataset for all csv files that are available for the selected runtime.

Now its possible to add dynamic content to the filepath and the Parameter of the dynamic linked service.

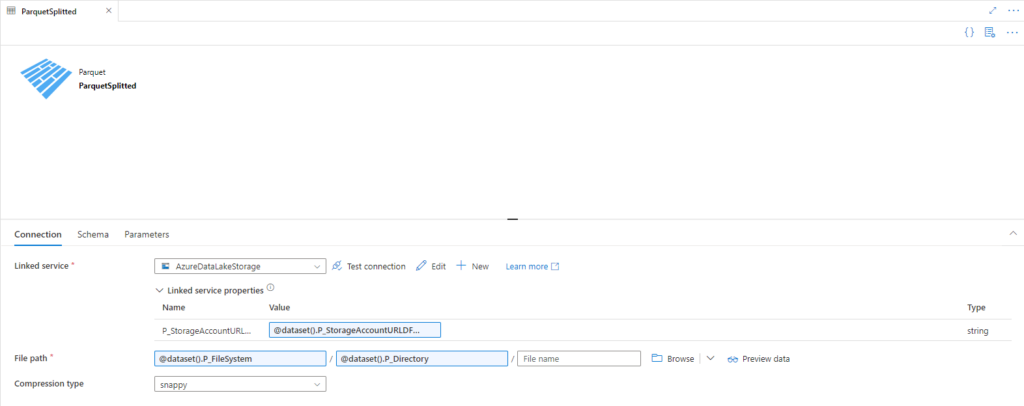
Do the same steps for a parquet integration dataset. I usually try to store the bronce layer in parquet format, since the most ETL tools can work with that. Parquet also supports datatypes, which is nice for sources that also have some kind of metadata.

Pipeline

Pipelines in Azure Synapse are containers for simple logical tasks, that needs to be executed in a certain order. On Pipline level all the tasks are called Activities. I recommend to create a folder structure for the different layers. To create a Pipeline simply click on the Integrate Symbol and afterwards on the + for the Pipeline option.

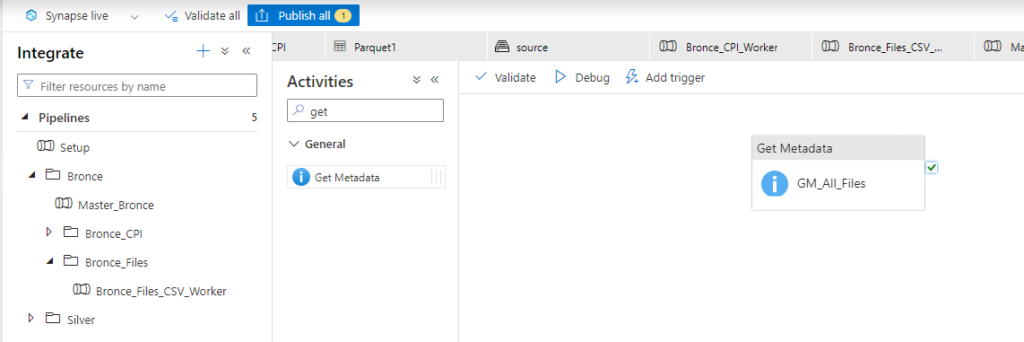
In order to process all files in a certain folder in the Datalake, we have to start with getting all the filenames. The correct activity to do so, is called ‘Get Metadata’.

If you’ve create a get Metadata activity, it needs to be connected to an integration Dataset. All the Parameters that were created in the Integration Dataset before are shown here, to provide some values. The Get Metadata Task has a mandatory option which is called ‘Field List.’

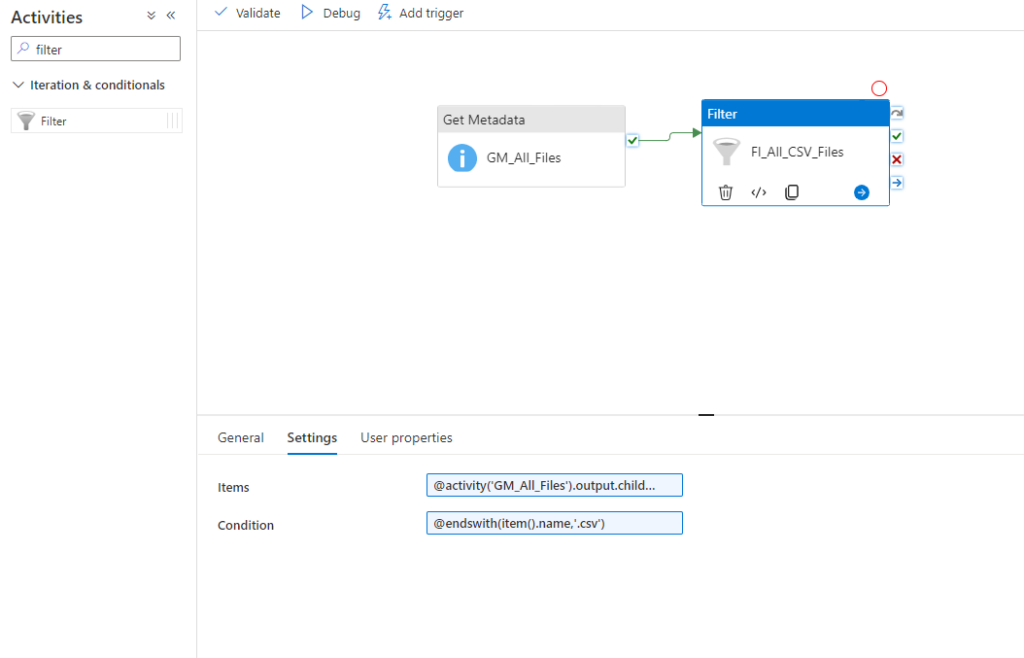
In order to get the list of all Child Items (aka Files/Folders) you need to use this formular: @activity(‘GM_All_Files’).output.childItems

Now you can create a Filter activity to which filters for example for a certain filename like this: @endswith(item().name,’.csv’)

To iterate over all files add an ForEach activity, where you define to loop over @activity(‘FI_All_CSV_Files’).output.Value.

Within this loop its possible to add multiple activities. In our case we want to use a copy data task where we define the filename as the name of the current item. You can refer to the current item like this @item(). Afterwards you have access to all properties. In our case we want the name property.

As sink we use the parquet linked service. I usually recomment to use the same name as the source name and just replace the filetype.

I hope this little guide gave you a short introduction into Synapse Pipelines and how to ingest data with it into a data plattform.

Setup Secure Azure Databricks Workspace (Azure Plattform Compare Series Part 3)

Hello fellow Data Enthusiasts and welcome to my Blog,

if you’ve missed my Blogpost about the Azure Basics please check the Hub and Spoke Part of it before you go on in this post. Make sure you have a managed identity, which has acess to the encryption key vault in the Azure Landing Zone.

Networking

If you want to setup a new Databricks environment I highly recommend to do so in a new Spoke VNet which has at least the size /24 and a peering to the Hub Net. Split the VNet into at least 2*/26 Subnets. This will allow you to create 59 cluster nodes. In case you need more nodes check this page for the networking requirements. Here an example of and subnet configuration:

Deligate the 2 /26 subnets to Databricks:

Create a NSG and associate it with the two /26 Subnets

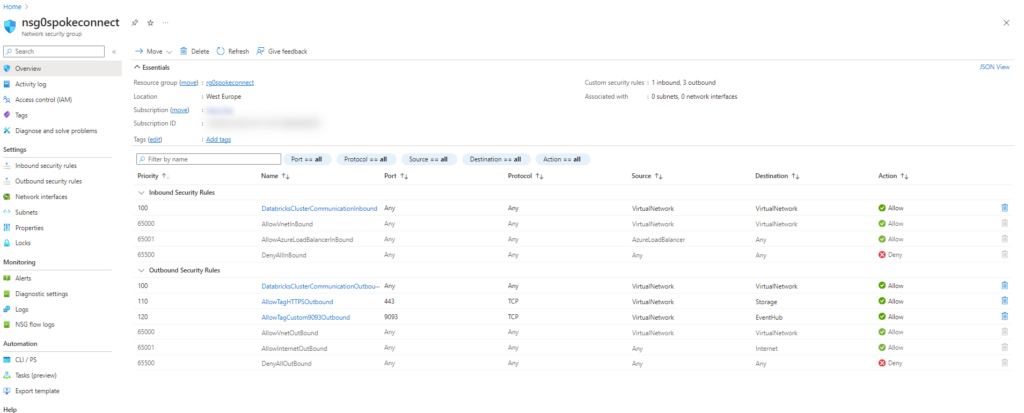
Add these Rules to the NSG

Storage Account

Create Storage, with private access only. Don’t create private Enpoints here, since Microsoft will then add a random values at the end of the private Endpoint name.

Instead, create the private Endpoints afterwards and I recommend the following naming pattern pe0<storage account name>0<endpoint> and to put them into a separate ressource group.

Set the Storage to use the encryption key from the key vault of the Azure Landing Zone

Databricks

For all security features, you’ll need a Premium workspace. For the managed ressource group I suggest to use mrg0<databricksworkspace name>.

In the Networking tab, you get to define the address spaces and names for Spoke VNet 1 & 2. I suggest refraining from creating private endpoints within the initial setup again, because here, you’ll get again a random string at the end of the name.

The encryption of databricks works a bit different than the one of the storage account. Here the setup requests to enter a key identifier. Someone with access to your encryption key vault could provide this String, which can be found within the key

So this encryption tab should look like this (You could enable to automatically rotate the key).

Note: Make sure the ‘AzureDatabricks’ Service Principal has acess to the Key Vault Keys. You’ll find this Service Pricipal only in Key Vault ressources.

Now create the private endpoints for the databricks workspace, with your naming pattern.

Note: You only need one browser_authentication endpoint for the whole network. So make sure, this private Endpoint is either in the Hub or in your production environment.

Now setup the private DNS Zones in your Hub and then everything is done.

I hope this little guide helps you in your further projects.

Setup Secure Azure Synapse (Azure Plattform Compare Series Part 2)

Hello fellow Data Enthusiasts and welcome to my Blog,

if you’ve missed my Blogpost about the Azure Basics please check the Hub and Spoke Part of it before you go on in this post. Make sure you have a managed identity, which has acess to the encryption key vault in the Azure Landing Zone.

Networking

To create an Azure Synapse Workspace you won’t need a big VNet. I recomment to create a new Spoke VNet with the sice of at least /26, so you have enough room for potentially multiple workspaces. Since the Synapse componets won’t need a Subnet delegation there is no need create some.

In order for Azure Synapse to work we won’t need any NSGs.

Storage Account

Create Storage, with private access only. Don’t create private Enpoints here, since Microsoft will then add a random values at the end of the private Endpoint name.

Instead, create the private Endpoints afterwards and I recommend the following naming pattern pe0<storage account name>0<endpoint> and to put them into a separate ressource group.

Set the Storage to use the encryption key from the key vault of the Azure Landing Zone

Azure Synapse Workspace

When you create a Synapse workspace you’ll need to define a managed ressource group. For this I recommend to add mrg0 in front of the actual synapse workspace name.

I would suggest to only use Entra ID to authentication, since this is much easier to maintain.

In order to activate the double encryption for the dedicated and serverless SQL pool you’ll need an encryption key. You could manage this within a key vault. If you use a key vault, you’ll need a user assigend managed identity or you could give the permissions to the system assigend managed identity after the workspace creation.

To connect to the different system you’ll need to activate the managed virtual network. You should also disable the public access to the workspace.

Now create the private endpoints for the synapse workspace, with your naming pattern.

Note: You only need one web endpoint for the whole network. So make sure, this private Endpoint is either in the Hub or in your production environment.

Now setup the private DNS Zones in your Hub and then everything is done.

I hope this little guide helps you in your further projects.

Setup Microsoft Fabric (Azure Plattform Compare Series Part 1)

Hello fellow Data Enthusiasts and welcome to my Blog,

today we’re looking into the setup of Microsoft Fabric and how to create this as good as possible. This Post is probably for you, if you don’t have any PowerBI premium capacity, or if your tennant is in a region where Fabric currently isn’t available. Please check this page for a list of all available regions.

In order to create a fabric capacity, log into the Azure Portal and search for ‘Microsoft Fabric’.

If you click on Create you’ll be introduced to a very short setup. Currently Microsoft doesn’t provide any naming abbreviation for a fabric capacity so I took ‘fc’.

Please note that your data will be stored in another region if your tennant region isn’t available.

That’s already it for the Azure Portal.

Then move to the fabric portal and create a new workspace if you don’t want to impact anything on your exsisting Power BI workspaces. Otherwise this will also work on an old workspace.

In the workspace click onto ‘Workspace Setting’.

Then go into the ‘Premium’ Tab and select ‘Fabric capacity’ and then in the dropdown choose the correct capacity.

Unfortunately Microsoft currently doesn’t support any Networking ressources like private endpoints or private DNS Zones.

I hope this little guide helps you in your further projects.

© 2024 Geckert Consulting

Theme by Anders NorenUp ↑